
Thanks this week to Linda Snider, who sent in a recipe for white gluten-free bread in response to a request from Helen Marshall. People living with celiac disease react adversely to gluten, which is found in all wheat flour-based baked goods, giving them texture and helping them rise.
Gluten-free bread is a tricky thing. While in some ways it’s easier to make than regular bread — with no kneading and a relatively quick rise — it is harder to make well. From friends who regularly bake gluten-free, I gather that even with a reliable recipe and a good gluten-free flour mix, the process still takes practice. And of course, as with all breads, temperature, humidity and altitude play their parts.
Ultimately, I just had to jump in and try it, but here are a few general tips I came across. Have all ingredients, including eggs, at room temperature. Don’t think you can get away without xanthan gum: this critical ingredient adds volume and viscosity to gluten-free baking. Xanthan gum and other specialized ingredients can be purchased most economically at a bulk-food store. Many gluten-free bread bakers swear by using a heavy stand mixer with the paddle attachment (not the usual dough hook), as some serious beating action is needed to add air.
Generally speaking, bread machines don’t work well for gluten-free recipes. Make sure you grease the pan generously — gluten-free dough is quite sticky — or even better, use greased parchment paper. You’ll need to smooth the loaf with a wet spoon before it starts to rise because it won’t smooth itself out. And keep an eye on the bread during the rising time. You want it to rise until it starts to crest the top of the loaf pan, but you don’t want it to go much past that: Gluten-free bread that over-rises is prone to sudden, disastrous collapse.
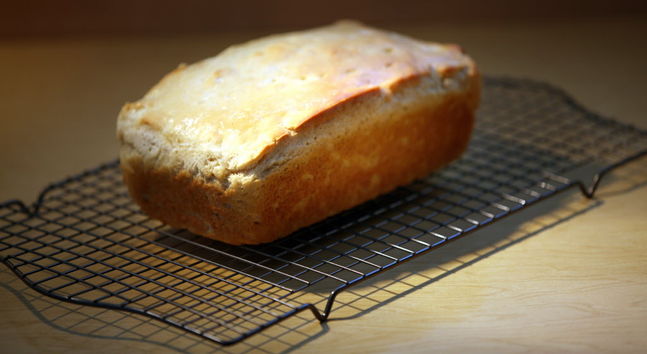
The loaf might also start to brown before it is baked through: just tent with foil and continue baking. Once the bread is baked, you might want to run some butter or oil over the still-warm loaf to soften the crust. Within a few minutes of taking the bread from the oven, release the loaf from the pan to cool on a wire rack so it doesn’t steam and get stodgy.
Also, make sure to cool the loaf completely before slicing — gluten-free bread is apt to crumble when warm. It also dries out quickly. Loaves can be stored in an airtight bag on the counter for about two days, but beyond that should be frozen for later use.
Finally, spring will be on its way (eventually!), so please send in any seasonal requests. If you can help with a recipe request, have your own request, or a favourite recipe you’d like to share, send an email to recipeswap@freepress.mb.ca, fax it to 697-7412, or write to Recipe Swap, c/o Alison Gillmor, Winnipeg Free Press, 1355 Mountain Ave. Winnipeg, MB, R2X 3B6. Please include your first and last name, address and telephone number.
Gluten-Free Sandwich Loaf
375 ml (1 1/2 cups) warm whole milk (38 C or 100 F)
60 ml (4 tbsp) honey
12 ml (21/2 tsp) active dry yeast
750 ml (3 cups) gluten-free flour mix with xanthan gum (if prepared mix does not contain xanthan gum, add 15 ml or 1 tbsp)
7 ml (11/2 tsp) additional xanthan gum
20 ml (4 tsp) baking powder
5 ml (1 tsp) salt
10 ml (2 tsp) cider vinegar
60 ml (1/4 cup) vegetable oil
2 eggs
Generously grease a 23 x 13 cm (9 x 5 inch) loaf pan. In small bowl, combine warm milk and honey and then add yeast. Let proof for about 5-10 minutes, or until mixture is foamy. In medium bowl, whisk together gluten-free flour mix, xanthan gum, baking powder and salt. In bowl of stand mixer fitted with the paddle attachment, mix cider vinegar, oil and eggs. Add yeast mixture and beat for a few seconds. Add the dry ingredients and beat on medium-high for about 3 minutes. Dough will be wet, thick and sticky. Using a spatula, scrape the dough into prepared loaf pan, smooth out the loaf with the back of a metal spoon dipped in water, and set in a warm place. Let rise for about 30-50 minutes or until dough is just starting to crest the top of the pan. (Time can vary depending on temperature of room.) Meanwhile, preheat oven to 190 C (375 F). Bake for 30-45 minutes, or until risen slightly and browned. (It can be hard to tell when gluten-free bread is done. An instant-read thermometer should read about 95 C or 200 F.) If the crust is darkening too quickly, you can tent with foil, leaving openings at the short ends. Remove from oven and let cool 3-5 minutes before turning loaf out onto a wire cooling rack. Cool completely before slicing. Store in an airtight bag at room temperature for up to two days or freeze for later use.
Tester’s notes: This bread has a dense, soft texture and would be good for sandwiches or toast. I didn’t grease the pan well enough and had some trouble getting this one out without some big gouges. Next time, I’ll use parchment paper.
White Gluten-Free Bread
375 ml (11/2 cups) warm water (38 C or 100 F)
15 ml (1 tbsp) active dry yeast
45 ml (3 tbsp) granulated sugar
325 ml (1 1/3 cups) rice flour
150 ml (2/3 cup) sorghum flour
125 ml (1/2 cup) potato starch
125 ml (1/2 cup) cornstarch
7 ml (11/2 tsp) salt
15 ml (1 tbsp) xanthan gum
80 ml (1/3 cup) vegetable oil
3 eggs
Generously grease a 23 x 13 cm (9 x 5 inch) loaf pan. In small bowl, combine warm water and sugar and add yeast. Let stand until yeast starts to foam, about 5-10 minutes. In large bowl, combine rice flour, sorghum flour, potato starch, cornstarch, salt, xanthan gum, yeast mixture, oil and eggs. Beat on medium speed for about 2 minutes. Spoon dough into prepared pan, smooth top with a wet spoon, then place in a warm place until it rises just to top of the pan, about 45-60 minutes, depending on temperature. Meanwhile, preheat oven to 190 C (375 F) and bake until loaf is turning golden brown, about 25-35 minutes. Remove from oven and let cool 3-5 minutes before turning loaf out onto a wire cooling rack. Cool completely before slicing. Store in an airtight bag at room temperature for up to two days or freeze for later use.
Tester’s notes: Using a gluten-free flour mix is easier, but I found this custom mix yielded better overall results, with a nice flavour and texture.
Source: Baking gluten-free bread isn’t a piece of cake – Winnipeg Free Press.
Related articles


